
Having a center stove or cooktop can make your cooking experience more enjoyable. It almost feels like you are in a cooking show or living the movie life.
Also, you get to keep an eye on everything as you are not looking out for your surroundings. A 007 vibe! But the only downside is, that you cannot install a regular range hood over your cooktop. You’ll need an Island hood.
It’s the same thing as a range hood, but you need a bit of an idea of how to put it up. How to install a Island Range Hood you say? You take some precise measurements of the bracket, mark them up with a pencil, drill some holes, install the bracket, install the duct, and then put the Island Range hood up.
Seems all confusing, right? Not to worry! We are going to walk you through the steps. Let’s start doing some handyman work!

Steps To Install An Island Range Hood
Installing an Island Range hood is easy, if you have everything needed spread out and have patience. Because you will have to work on top of the ceiling and take your time on securing everything. It’s like working on an art and being it on an Island, you will need to be precise and measure it out before putting it up. So let’s do it.
Things you will need
- Drill machine.
- Pencil.
- A water level.
- Screws.
- Foil tape.
- The range hood, duct, and chimney.
Step 1: Center Your Island
You will need to center the measurement before you put everything up, even before drilling. A Plumb Bob can help you with it. Take the measurement and mark the center. Then proceed with the other parts.
Step 2:Measure It Out And Mark
Take the ceiling bracket and mark all around it on the ceiling. Make sure to mark the screw holes too. Do this keeping the center, well in the center.
Step 3: Drill Some Holes
When everything is measured out, start drilling the holes. Use the right size drill bits of the screws so you don’t drill a bigger hole.
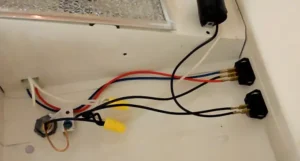
Step 4: Install Vent Hose And Lower Chimney Support
When all the holes are drilled, start connecting and installing the vent hose. Yes, you need to go through the steps of installing the inside parts, and then moving on to the outer parts. After the vent hose, install the lower chimney support. Secure it with screws. You don’t want to hang on the ceiling installing the parts of the range hood. Better put it together and then lift it up.
Step 5: Screw The Ceiling Bracket
Use screws, anchors to secure the ceiling bracket. The ceiling bracket will keep the chimney up. So if your range hood and chimney are a bit heavy, use metal anchors instead of plastic ones.
Step 6: Attach And Connect Chimney Upper And Lower Support
Put everything up and secure the chimney’s upper and lower support. Start with the upper one, and secure it with the screws that come with it. Then slide in the lower support and do the same. Double-check if everything is in place.
Step 7: Connect Duct And Install The Island Range Hood
When the chimney is up, start connecting the duct. Connect both the ceiling duct with the range hood duct and secure it with foil tape. And then secure the Range hood in place.
Step 8: Install The Filters
Install the filters at this point, as you are done with all other parts. Then proceed to the electrical parts.
Step 9: Test And Enjoy
Connect the wiring and start a test run. If it runs perfectly, it’s time to clean everything up. Now you are ready to use the Island range hood. Start cooking some of your favorite dishes right away. We know we would.
Pro Tips:
- Island range hoods should be 24” to 36” on top of the cooktop. Raised too much and it won’t perform well and you will have smoke everywhere.
- The range hood should be 20 inches wider than your cooktop. So get the right size range hood.
- Always check the duct size before installing. If there is a gap in them, get it changed.
- Make sure to change the range hood before putting it up. Once it is installed, it will be a lot of work to take it down if it doesn’t work properly.
FAQs – Frequently Asked Questions and Answers
How do you position an island range hood?
You should always position an island range hood 24” to 36” above your cooktop. Also, make sure that your ceiling has a load-bearing framework, or the chimney will come down crushing. Use a plumb bob to get the center alignment.
How much does it cost to install a range hood over an island?
Range hood installation cost depends on the area, type of range hood, and your home kitchen settings. It ranges from $175 to $3000. So it is best you consult with the manufacturer to get the actual price tag.
Can you install island mount range hood on wall?
Yes, you can. However, the effectiveness will not be the same when it is mounted as an island hood. It will decrease exponentially.
Conclusion
Island range hoods are an amazing option for open cooktops or stoves. But keeping it on the ceiling and installing it is the hard part. Just install it with patience and you will be fine. If you don’t have any experience with installing an island hood, make sure to call for some professional experts.
![Read more about the article [Answered] Can a Range Hood Vent into the Attic?](https://kitchenhoodcare.com/wp-content/uploads/2023/10/Can-a-Range-Hood-Vent-into-the-Attic-300x161.webp)
![Read more about the article [Explained] Where to Put Outlet for Range Hood Under Cabinet?](https://kitchenhoodcare.com/wp-content/uploads/2023/10/Where-to-Put-Outlet-for-Range-Hood-Under-Cabinet-300x161.webp)